What can you edit?
You can edit Room Use code, Number of Stations, Department Name (with approval – you will be contacted), Occupant, Room Name (optional)
What can’t you edit?
You are not able to edit Area (sf), room number, function. You also can't add or delete a room.
Room Edit Examples
- Navigate to the Room
-
There are multiple ways to do this. Here is one method:
- Navigate to your unit’s Space Inventory by selecting Divisions from the FacilitiesLink home page.
- Select your Dean or Vice Chancellor’s Office from the list.
- Select your Department.
- Scroll down the page to the Space Inventories section. Click on the icon showing a list of rooms. Your current departmental space inventory will be displayed. From your list of rooms, click on a room number (in blue).
- The room summary screen will open.
To edit, click on Update Room in the top left corner of the screen (in blue). If you do not see Update Room, you do not have editing privileges. Contact your supervisor to determine if you are authorized to edit rooms.
When you click on Update Room, the screen below will open. The orange arrows indicate areas you can update.
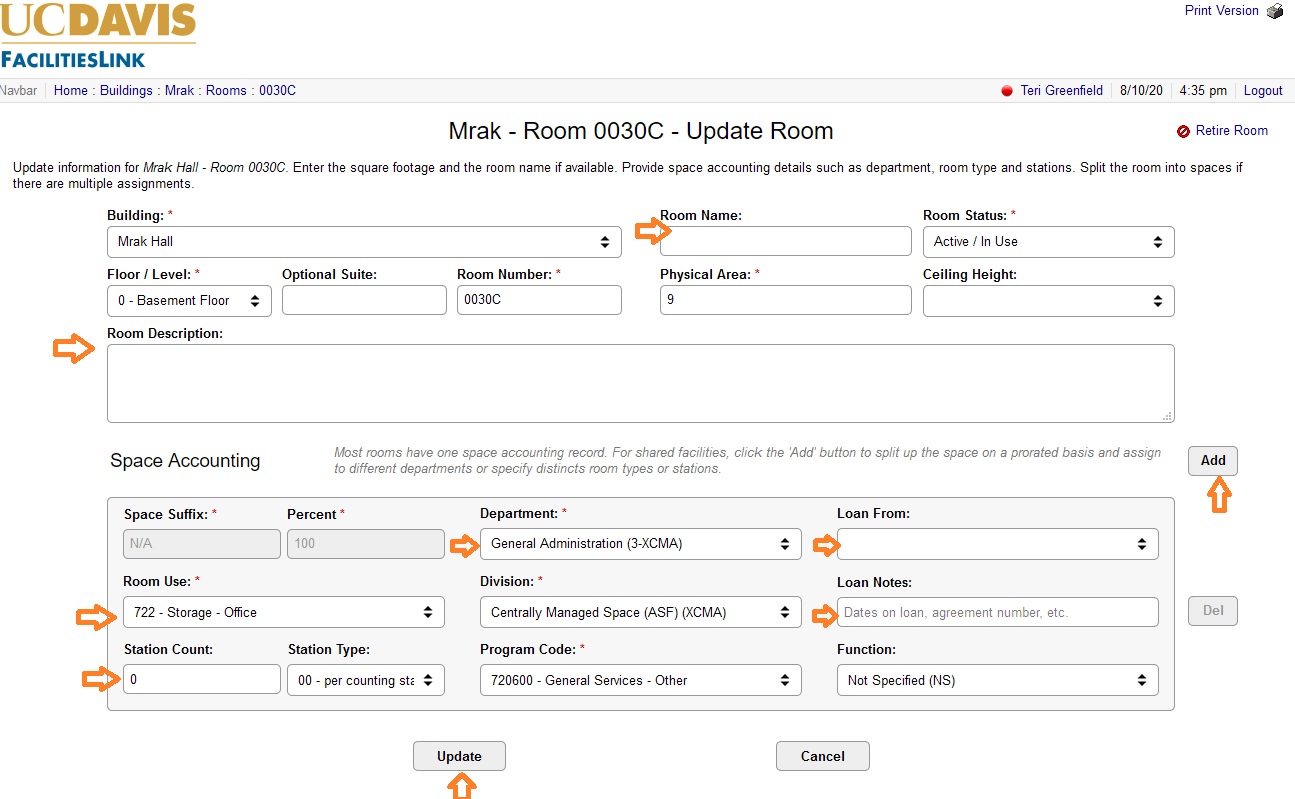
You must click on Update at the bottom of the screen, or your changes will not take effect.
- Example 1: How to Change the Room Use Code
-
To edit a room, click on Update Room in the top left (in blue).
Click on arrow next to Room Use to open a “pick list” of possible codes.
Select a room code based on the primary usage or activity that occurs in the room, rather than the function or subject field served by the room.
A complete list of definitions of room types, with exclusions, is available on FacilitiesLink under the heading “Room Use Types”. Contact us if you have any questions about how to classify a room.
Click on Update at bottom of screen.
- Example 2: How to Change the Department
-
To edit a room, click on Update Room in the top left (in blue).
You can select a new Department by clicking on the arrow on the right edge of the Department box and selecting the new department from the pick list.
We may contact you and/or your Dean’s Office for more information about changes between departments.
Click on Update at bottom of screen.
- Example 3: How to Change the Room Name
-
To edit a room, click on Update Room in the top left (in blue).
You can enter a descriptive name in the “Room Name” box. For example: “Server room” or “Break Room” or “Paul Smith’s Faculty Office”.
Room Name can be useful when you print a list of rooms.
You can also search for unique room names in the Space Inventory module.
Click on Update at bottom of screen.
- Example 4: How to Change the Number of Stations
-
To edit a room, click on Update Room in the top left (in blue).
You can type in the number of stations on the line called “Station Count”. If no station number is required for that room type, the Station Type will show “00-per counting standards”.
A station number is required for the following room use codes:
-
110 – Classroom (number of student stations under normal seating conditions, not extra chairs)
-
130 – Seminar Room (number of student stations under normal seating conditions, not extra chairs)
-
260 – Class Laboratory (the number of students that can be accommodated in the room at one time)
-
261 – Special Class Laboratory (the number of students that can be accommodated in the room at one time)
-
270 – Open Laboratory (the number of students that can be accommodated in the room at one time)
-
340 – Conference Room (the total of existing seats available in the room, plus a reasonable allowance for additional seating)
-
650 – Assembly (the normal audience seating capacity of the room)
-
Hospital/Residence Uses (810, 830, 852, 860, 9xx)
Click on Update at bottom of screen.
-
- Example 5: How to Divide a Room
-
Many departments have shared spaces (e.g., labs, cold rooms, break rooms). You may want to divide a room and assign a percentage of the space to more than one department, uses and/or functions.
Click Add on right side of Update Room screen. An additional section will be added for editing. A suffix of (X, Y, Z) must be appended to the room number. (If you have questions about this, contact Teri Greenfield at [email protected].)
Update the rooms as usual, but include a value for the percentage of space.
You are now able to add a Manager/PI to each part of the room.
You can add occupants to each part of the room.
Click on Update at bottom of screen.
- Example 6: How to Use “Loan To” and “Loan From”
-
Use the drop down list next to “Loan From” and select a Department. This should be the Department that loaned the room to the current Department.
Include the details of the loan in the Loan Notes box.
Click on Update at bottom of screen.